.svg)

Website owners often find that the information they need to display online changes over time. Whether you’re showcasing the latest events your company is hosting, a rotation of seasonal products or services, or information about your team members, you need a way to keep your web pages up-to-date.
You could go in and update them manually every time there’s a change, or you could use tech to your advantage and save yourself some web development hours down the line.
One of our clients is a tax and accounting firm with offices all across the New York State Metropolitan area. Some of their office locations change seasonally, and their office address information is displayed on multiple pages throughout their website. We wanted to make it easier and faster to dynamically update addresses as needed, and ensure our clients’ customers always have access to the latest information, displayed in the clearest way possible.
The solution our HubSpot developer came up with combines CX design and data management.
The client has a bulk locations page for each county/borough they serve, as well as separate pages for each individual location. To dynamically update all location pages, our deliverables were:
- Build a HubDB table containing all information about each office location
- Create web pages to display each borough’s locations individually, and another set of pages to show groupings of locations by borough
- Build custom modules that display address information for all locations within each borough/county
- Build custom modules that display information about each individual location
Here's how our team did it.
Step 1: Building a HubDB table
HubDB allows HubSpot users to store data in a table format. This data can then be queried for use on HubSpot-hosted or external website pages.
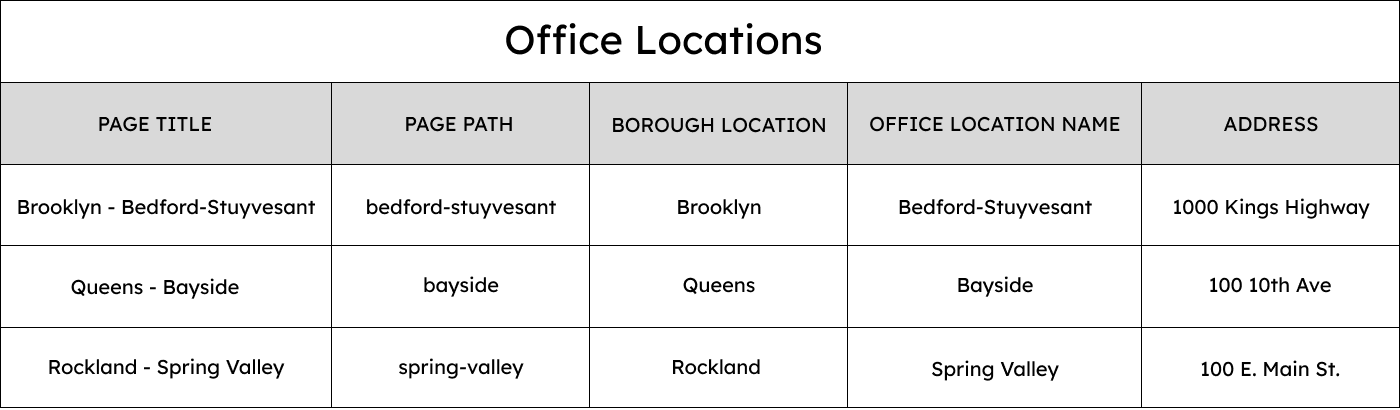
We created a HubDB table with all information about our clients’ offices, such as address, operating hours, and phone number. We also added a checkbox to indicate whether the office has moved locations that season.
This is a mockup of how the HubDB table is structured:
If you want to create a HubDB table but aren't sure where to start, here is a quick guide.
Step 2: Building the dynamic web pages
We then needed to prepare template web pages to host the location modules. In total, we ended up with 12 pages; 6 pages to display the groups of locations by borough, and 6 pages for the individual locations.
Rather than creating a separate webpage for each individual location, we used HubSpot's dynamic web pages feature to automatically create a web page for each location. To set this up, we created template pages for each borough, and set the data source on each page to the HubDB table “Office Locations”.
Each office location in the HubDB table has a set Page path value. When using dynamic web pages with a HubDB table as a data source, HubSpot creates a new page for every unique Page path value. The value is added as a subdirectory to the end of the template page's URL.
For example, if the dynamic page's URL is:
www.taxclient.com/offices
And your HubDB table has a row with a Page path value brooklyn, the dynamic page settings will clone the dynamic page and create a new page with the URL:
www.taxclient.com/offices/brooklyn
The content of the dynamic pages is populated via a custom module that selectively pulls location data from the HubDB table. The module matches the web page’s URL string to the Page path value in HubDB, and reads the data from the corresponding row. For example, the client’s Midtown Manhattan location’s HubDB row has the Page path “Midtown”, and the page’s URL ends in “Midtown”. The module queries data from the rest of the HubDB table row to populate the Midtown page. More on how we set that module up in step 4.
Step 3: Building the borough office modules
*Please note that in some code snippets, identifying information such as HubDB table ID has been altered for security purposes. Additionally, a space has been added between the first "{%" of each HubL snippet to prevent the web page from attempting to execute the code. Remember to remove the space if you adapt this code for your own purposes.*
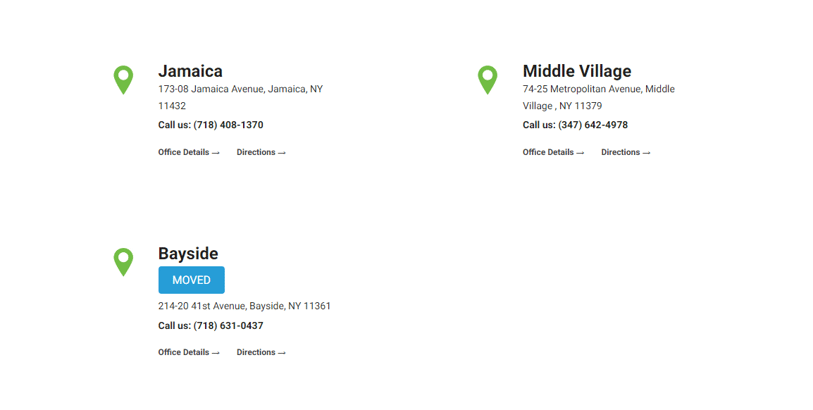
Next up was building global modules to display the addresses of all offices within each borough.
HubDB table data is queried using HubL, HubSpot’s templating language. Our modules use a combination of HubL, HTML, and CSS.
The modules pull and render data via For Loops and If Statements. For Loops are used to iterate through a sequence of variables, often ultimately with the purpose of rendering certain content on webpages. If Statements define conditional logic within a module.
The module targets the correct table by querying the HubDB table ID and borough location ID in a For Loop. The For Loop also excludes all inactive offices.
{ % for row in hubdb_table_rows(1234567, "borough_location=1111111111&office_active=Yes") %}The HTML that follows formats the headings and paragraphs, and queries location information from the HubDB table such as name, address, and phone number. We used an If Statement to create an alternate format in the cases where the office has moved.
<h4 style="font-family: roboto; font-size: 24px; margin-bottom: 0px;">{{ row.office_location_name }}</h4> { % if row.moved %}<a class="button-location" href="{{ row.moved_link }}">MOVED</a> {% endif %} <p style="font-family: roboto; font-size: 14px; margin-bottom: 4px;"> {{ row.address_1}}, {{row.city}}, {{ row.stateprovince }} {{row.zip_postal_code }} </p> <p style="font-family: roboto; font-size: 14px; font-weight: bold; margin-top: 4px;">Call us: <a href="tel:+1{{ row.phone_link }}">{{ row.phone }}</a></p>A button stating “MOVED” appears, and is automatically linked to the new location page.
Here is how the module looks on a live page.
Step 4: Building the individual office location modules
Rather than creating a module for each individual location, we created a module for each borough that can be used on all the individual location pages for said borough/county.
The module matches the URL of the dynamic page the module is placed on to the location with the same URL Page path value in HubDB. This tactic works to display only the location information that’s relevant.
The key is the use of the HubL filter split. Its function is to split the input string on a given separator. The first parameter “/” designates the separator, while the “4” states how many times the variable should be split. The URL is split on the backslash into four pieces, and the last piece is set as the page URL.
{ % for row in hubdb_table_rows(1234567, '') %}
{ % if row.hs_path == pageURL%}
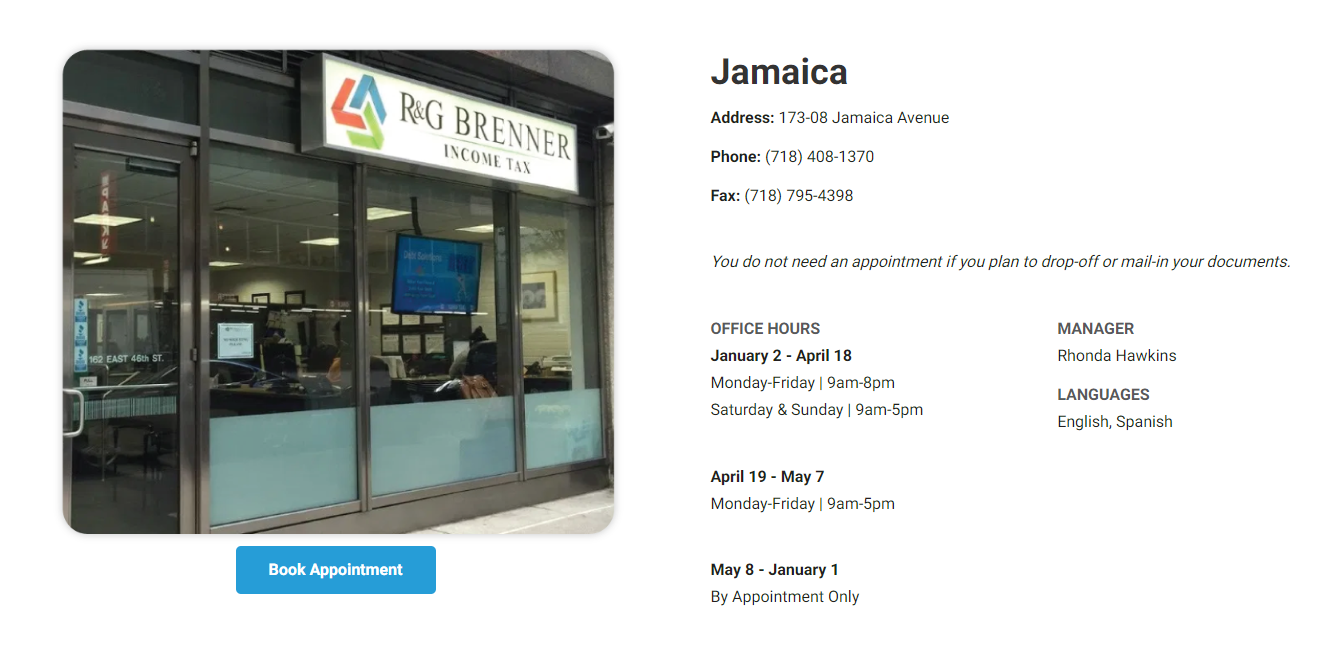
The module then calls all relevant data from the chosen HubDB row, formats it, and displays it on the page. Here is how it calls and displays the image for each office, and creates a button with a link to the client’s online booking service.
<div style="height: 50px; align-items: center; display: flex; justify-content: center;">
<a class="button-link" href="{{row.calendar_link}}"><button class="button">Book Appointment</button></a>
Here is the resulting page for their Jamaica, Queens location.
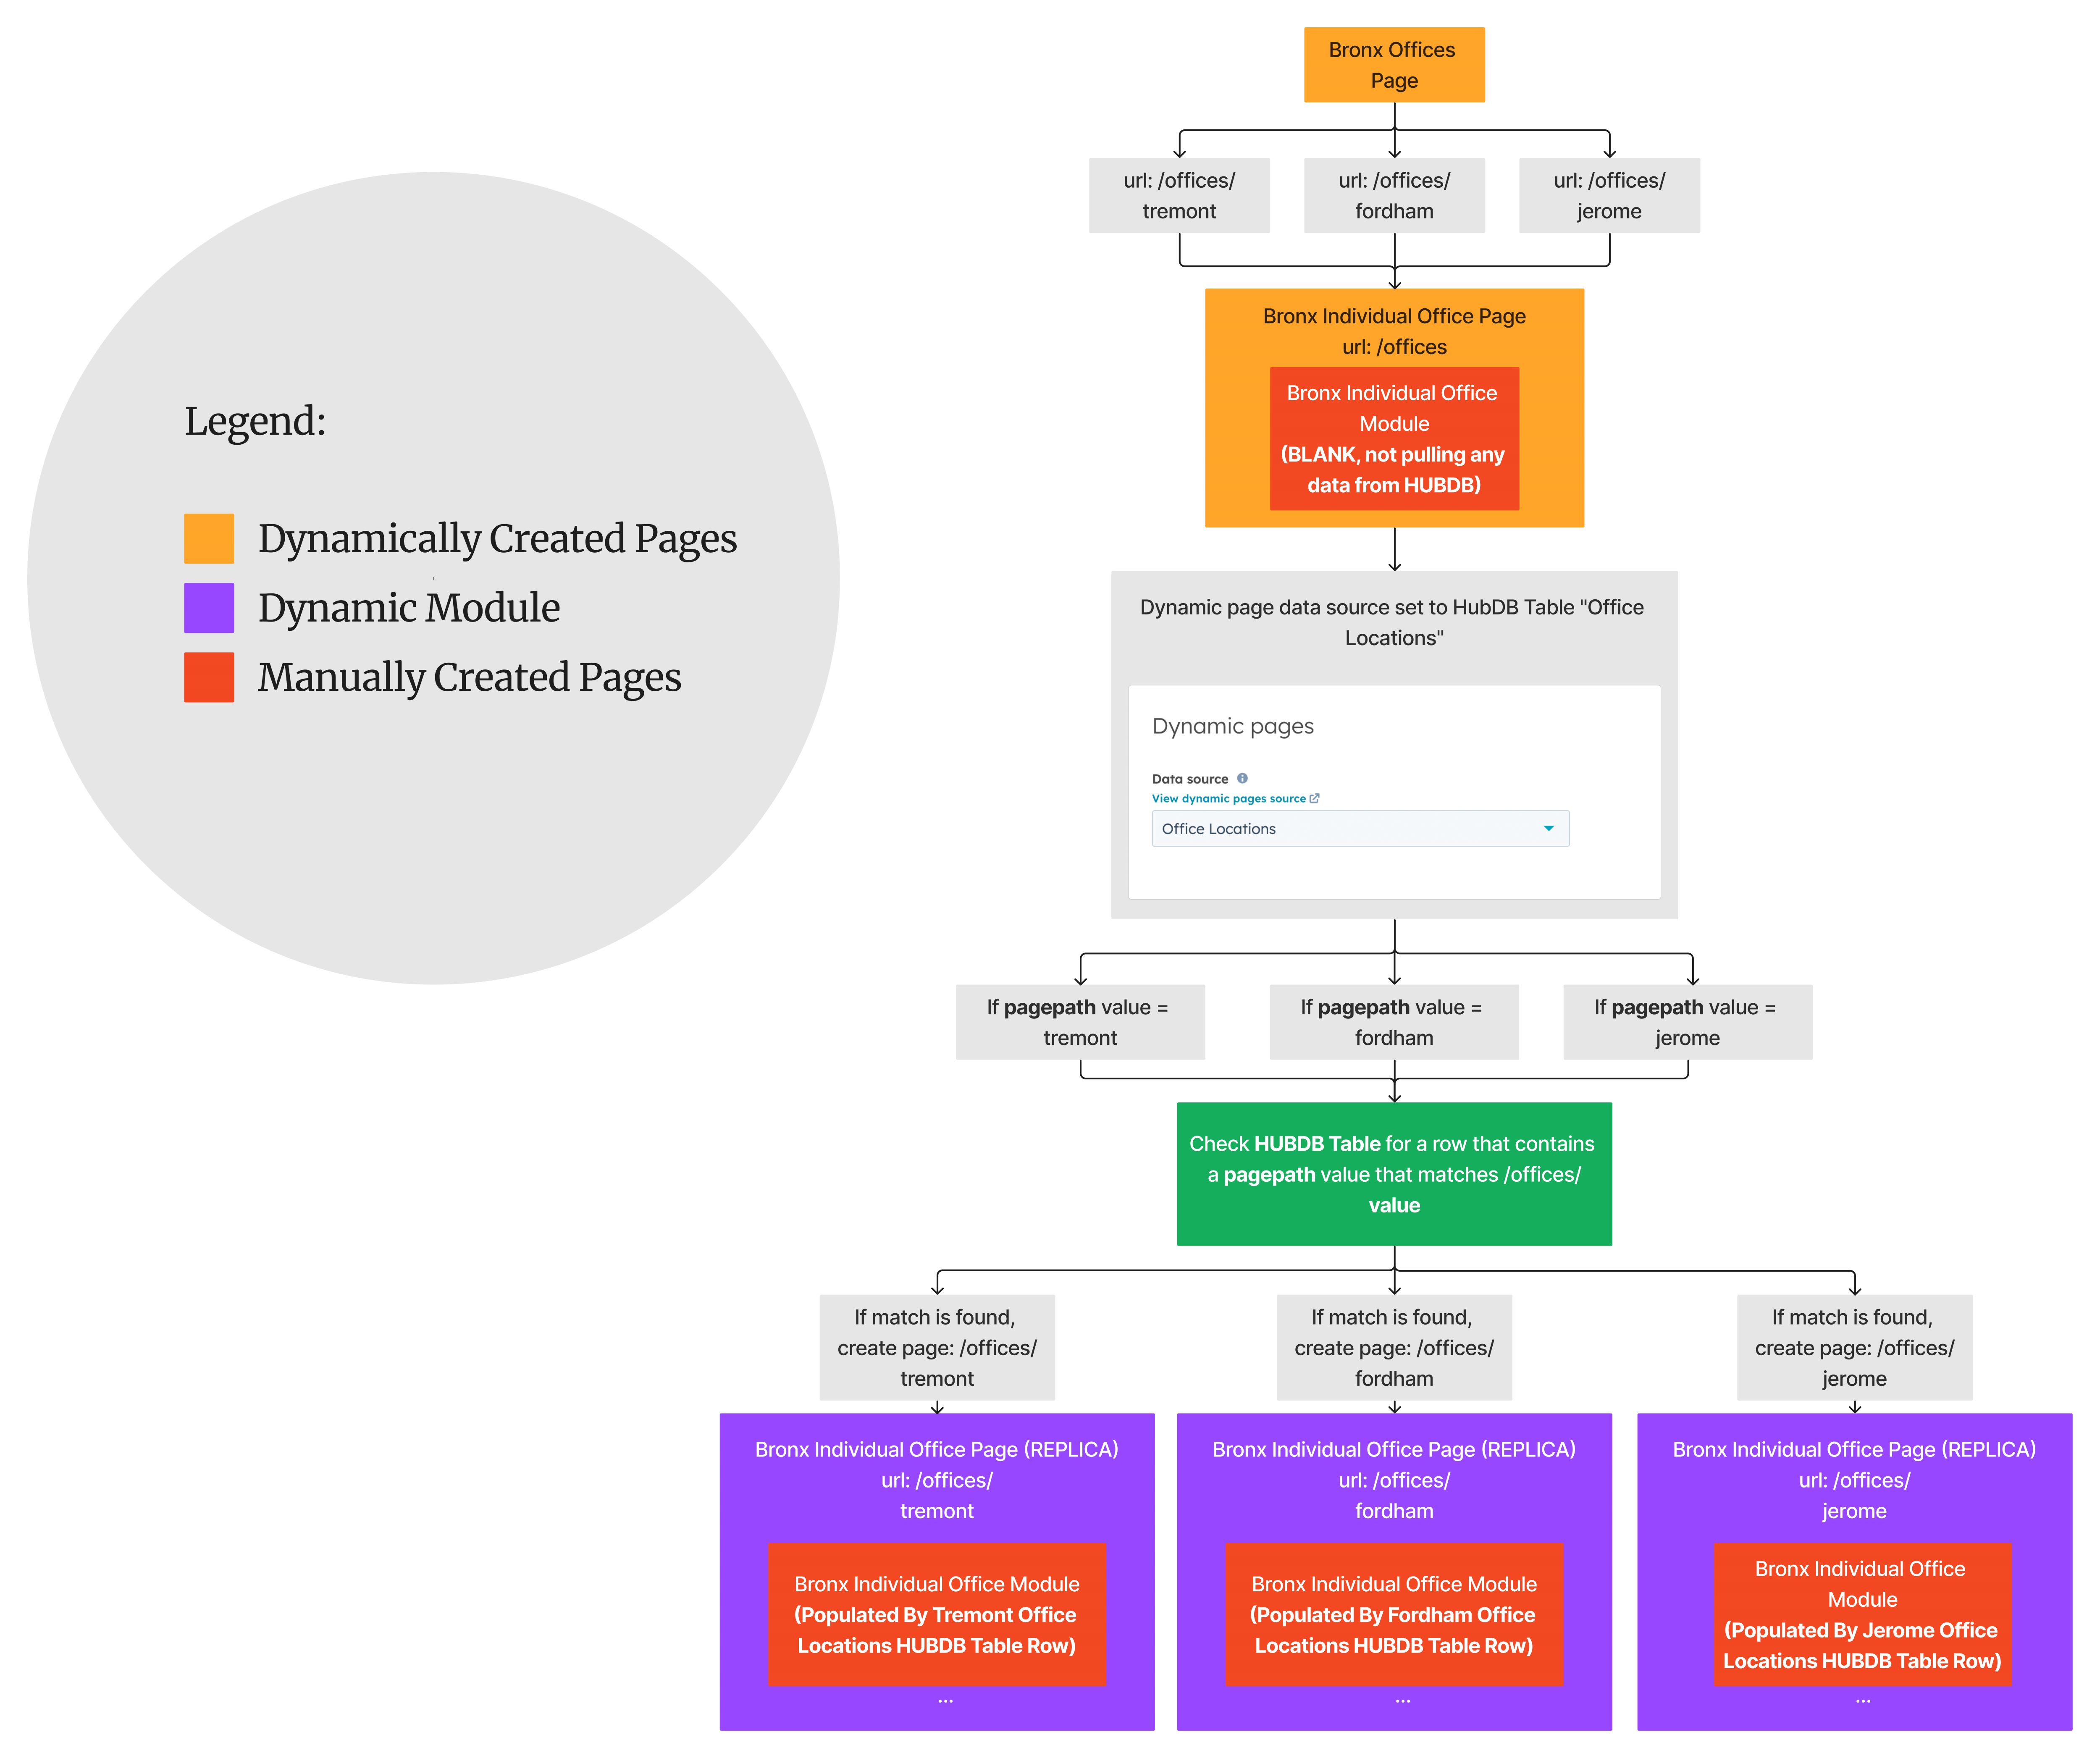
The flowchart below sums up the whole process of how the dynamic pages are created, using our client’s Bronx locations as an example.
The result: Better CX
The objective of our efforts was to save our client time in multiple ways:
- Decrease time spent on web development - no need to manually update webpages every time there’s a change in location
- Create a user-friendly design, so customers are well-informed. CX design increases customer satisfaction and frees up bandwidth for the customer service associates, since they won’t need to spend as much time answering common inquiries.
We’re happy to say our work paid off. Read our case study to find out more about the outcome of this project.
As a HubSpot growth agency, we’re always looking for HubSpot hacks that make our lives and the lives of our clients easier. In the near future we’ll be sharing more tips for streamlining and optimizing our web development operations with HubSpot, so be sure to keep checking back.


.svg)